I have done something that I thought that I would never have done. I forgot the root password on a CentOS server/workstation.
I don't know if I just had my hands on the wrong keys where I was typing the password or what but I forgot it.
Luckily, there is a way to reset this lost password.
First, you will need console access to the server, meaning, you will need to be physically sitting or standing in front of the server and have physical access to it. SSH remote access will not work.
Next, reboot the server/workstation.
Now, once it is starting to boot backup, you need to interrupt the boot at the GRUB stage (The first count down after you push the power button) by pressing a key like the space bar.
Next, press the "a" key, this will bring you to a command line with a command pre-typed for you. On the line that is there, remove (backspace) the "rhgb quiet" and add a "1" and then press enter.
This will boot into the root shell and NOT a login prompt. This is a single user mode.
From here you can enter the passwd command and reset the password. You can also reset other users passwords and do other administrative tasks.
Once you are done, reboot the server and let it boot normally.
*Note: If you are using CentOS 6 and have SELinux enabled, you will need to do either 1 of 2 things; add "selinux=0" in addition to the "1" from above or issue a "setenforce 0" command after you login and before resetting the password.
Original Source:
http://wiki.centos.org/TipsAndTricks/ResetRootPassword
Thursday, December 19, 2013
How To Setup DRBL (Diskless Remote Boot in Linux) On CentOS 6
I know it has been a while since my last post. Since my last post I have changed jobs from a public K-12 education environment to a private manufacturing environment and this has caused me to refocus my time and efforts on to other things. The job change has also given the time to research and implement some of those back burner projects that I just never had the time for.
One of those back burner projects that I have been wanting to get to for a long time is thin client computing. I have been messing around with the idea of thin clients for almost the last 10 years.
During this time, I understood the big picture of how thin client computing works. A client boots from a CD/DVD/Network/USB/whatever and gets a GUI terminal from the server. The client terminal sends commands to the server, the server processes those commands and sends back an updated GUI screen.
This is a great idea when you have a large number of computers that all need the same software and/or requires little change. Thin clients can save a lot of time. An example I can give is a computer lab of 30+ computers in an elementary or middle school.
Can you imagine the amount of time it would take to install a program like Microsoft Office on 30+ computers? Of course there are faster way to do this but stay with me here for a minute. Lets say that Microsoft Office, from a disc, on 30 computers in a lab. Each install in 20 minutes. Since you only have one disc, you have to do the install one computer at a time. At 20 minutes each, it would take you over 10 hours to complete this. Not my idea of fun.
Now in a thin computing environment, all you would have to do is one 20 minute install and possibly a reboot of the thin client computers.
Alright, enough with me jabbering and on to what you are wanting. The How-To
I chose to go with DRBL because it has been the easiest to setup out of all the other ones that I have seen by far.
My Equipment:
Server (Virtual)
- Dual processors
- 1GB memory
- 10GB hard drive
- 2 network adapters that function at gigabit speed.
- NIC #1: IP Address 10.0.3.2 Subnet/netmask: 255.255.255.0 Gateway: 10.0.3.1
- NIC #2: IP Address 172.16.0.1 Subnet/netmask: 255.255.255.0 No Gateway
Thin Client (Dell Dimension 4700)
- I removed the hard drive
- 512MB memory
- Install the server operating system. During the install, make sure you set the IP addresses for your NIC cards. I used CentOS 6 with the GUI. I have explained this before so I am not going to bore you with that.
*Note: The developer's install instructions suggest that you have at least to network cards installed in the server. You can do this setup with one and create subinterfaces but you might sacrifice performance in the long run when you start to add more clients. - Update all the system software with a "yum update -y" and disable SELinux (edit /etc/selinux/config) and reboot.
- Turn off and disable NetworkManager. To do this, open a terminal window and type "service NetworkManager stop" to turn off and "chkconfig NetworkManager off" to keep it from starting up when the server is booted.
- Now we need to install some keys for DRBL. In the terminal window, type "rm -f GPG-KEY-DRBL; wget http://drbl.org/GPG-KEY-DRBL; rpm --import GPG-KEY-DRBL" then type"gpg --keyserver subkeys.pgp.net --recv-key D7E8DF3A" and then finally type "gpg -a --export D7E8DF3A > GPG-KEY-DRBL; rpm --import GPG-KEY-DRBL".
- Download the DRBL RPM file. You can find the most current stable version here. I downloaded version 2.6.15 (filename: drbl-2.6.15-drbl1.noarch.rpm)
- Install the DRBL RPM file. Since the DRBL RPM requires a Perl module, it is easier to use yum instead of rpm because it will automatically download and install the needed modules. Type: "yum install drbl-2.6.15-drbl1.noarch.rpm".
- For this next step, there are two scenarios. Since there is a broadband connection, I went with the first one. Type "drblsrv -i" and follow the on screen prompts. *Note: There is a space before the "-i".
- Now we are ready to do the setup for the thin clients. Before you run the "drblpush -i" command, I suggest you read this. It provides a lot of information that is useful but is outside of the scope of this post.
- If you have not done so already, run the "drblpush -i" command and answer the questions in the guide. I pretty much stuck with the default choices with the exception of Clonezilla. I chose not to use it.
- Once "drblpush -i" command has completed, you are ready to prepare the client computers.
- I disconnected and removed the hard drive from the client machine, you don't have to
- In BIOS, set the network card to enable PXE and set it as the first boot option.
- Save and exit. - Boot the client. Log in and enjoy the fruits of your labor.
Original Source:
Wednesday, October 9, 2013
Group Policy - Password Settings Location
I thought that I was pass this along.
Below is the location in Group Policies that controls password settings.
Computer Configuration > Policies > Windows Setting > Security Settings > Account Policies >Password Policy
The policies you can set here are
Password Age (both minimum and maximum)
Minimum Length
Require Complexity (Min of six characters, can't contain user's account name or full name, and any 3 of the following: one capital letter, one lower case letter, a number, and a non-alphabetical character (for example, !, $, #, %))
If you want to change the default change password notification from 14 days, you can find it here:
Computer Configuration > Policies > Windows Setting > Security Settings > Local Policies > Security Options > Interactive logon: Prompt user to change password before expirationI have changed it from 14 day to 7 days.
Tuesday, October 8, 2013
Compacting Linux Hyper-V VHDs
To compact linux VHDs, run the command below before you shutdown the virtual machine.
Original Source
http://blogs.msdn.com/b/virtual_pc_guy/archive/2005/08/23/454846.aspx
cat /dev/zero > zero.dat ; sync ; sleep 1 ; sync ; rm zero.datThis creates a large empty file full of zeros and then deletes it.
Original Source
http://blogs.msdn.com/b/virtual_pc_guy/archive/2005/08/23/454846.aspx
Friday, October 4, 2013
Linux Command Line Cheat Sheet
I know that all of these commands are out there on Google, but this is a cheat sheet for me.
Copy files
Copy files
cp -R Source DestinationMount NFS volume
mount -t ip_address:/nfs_share /mount_location
Monday, July 1, 2013
PacketFence Active Directory Settings
If you have been following my posts, you know that I am working on creating some better documentation on how to setup PacketFence. Even though the guys over at Inverse have created a wonderful product that is free, I feel that there documentation on how to set it up is a little bit lacking, especially since portions of it still refers to hand editing configuration files through the command line.
In this post, I will discuss how to setup PacketFence to work with Microsoft Active Directory.
First thing we need to do is log in to the PacketFence server, then click on "Configuration" at the top, then "Roles" on the left. When users are authenticated, they will need to be placed into a role. With that said, it is easier to create the role first. It saves a lot time going back and forth between the two screens.
On the "Roles" page, click on "Add Role" at the bottom. A window will appear in the screen.
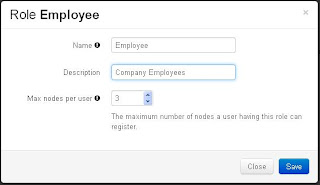 Under "Name" enter the name you want to give the role, a brief description for the role and the max number of nodes per user. In my example, you can see that I enter "Employee" into the name field, "Company Employees" for the description, and 3 at the max number of nodes (devices) for each user. Don't forget to save. Repeat this step for each role that you want to create.
Now, it is time for the good part. Click on the "Sources" button on the left. At the bottom, click "Add Source" then "AD".


In this post, I will discuss how to setup PacketFence to work with Microsoft Active Directory.
First thing we need to do is log in to the PacketFence server, then click on "Configuration" at the top, then "Roles" on the left. When users are authenticated, they will need to be placed into a role. With that said, it is easier to create the role first. It saves a lot time going back and forth between the two screens.
On the "Roles" page, click on "Add Role" at the bottom. A window will appear in the screen.

Now, it is time for the good part. Click on the "Sources" button on the left. At the bottom, click "Add Source" then "AD".

A "New Source" page will appear.
Every setting on this page will need to be filled in.
- Name: Give the source a name. I just named it the same as my domain controller
- Description: Give a brief description. "Company Employees" is my description
- Host: This is the IP address of your Domain Controller. Enter "389" for the second box. (389 is the default port that AD and LDAP use) and select none for the last box.
- Base DN: Enter the full path to your user accounts. Here is mine: "ou=Teachers,dc=School,dc=District,dc=k12,dc=State,dc=us".
- Helpful Tip: OU stands for Orginization Unit, DC stands for Domain Controller, CN stands for Common Name
- Scope: Select the type of scope you want. I selected "Subtree" because I have additional OUs in my Teacher OU
- Username Attribute: This is the name of the field that PacketFence will use to authencate users with. If you want to use the AD username, type in "sAMAccountName".
- Bind DN: Here you want to enter the full AD path of a user with domain admin rights. I used the administrator account: cn=administrator,ou=Domain Admins,ou=School,dc=District,dc=k12,dc=State,dc=us"
- Password: Enter the password for the account that you used with Bind DN.
Now, click on "Test". If you entered everything correctly, you will see a green bar across that says "Success". If not, double check everything you typed in. If you have nested OUs, you have to start with the deepest one and work backwards. So if your OUs are Company -> Department -> Sales, your Base DN and Bind DN should look like "ou=Sales,ou=Department,ou=Company,dc=Company,dc=com".
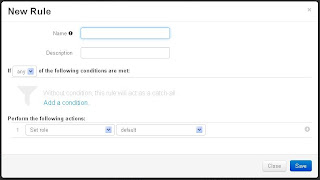
Once you have Success, click on "Add Rule". A window will appear.

Give the Rule a name. I entered "Employees".
If you would like to, give a brief description like "Rule for all Employees".
Under "Perform the following actions", select "Set Role" and then select the role you created early (Employee).
To the right of the role you selected, click on the plus (+) sign. Select "Set Unregistration Date" and select a date. I choose Jan.1st, 2020 for testing purposes.
Remember to save everything.
And that is it. Your users can now use their Active Directory username and password to register nodes (devices) with PacketFence.
PacketFence 4 Config
As you have probably have seen, the guys over at Inverse have released PacketFence 4.0 and then shortly after 4.0.1.
My initial reaction was the new version looks completely different than the older versions and I wasn't sure if I would like it. Now that I have used the new version, I have to say that I like the new web interface. There are a few things that are missing that I found helpful (such as being able to see the logs from web interface), but hopefully they will add them back in soon.
Anyway, on to what you have been waiting for:
How to setup PacketFence 4.0
Before we get knee-deep in configuring PacketFence, we need a few things. First you will need to determine what VLANs you want to use for Registration, Isolation, Inline, and MAC Detection. Next you will need to know all of the IP addresses of your switches that you want PacketFence to manage. If you have an Active Directory and you want to use it, there are some settings that you will need to know. (I will tell you what you need either later in this post or in a separate post.)
Another thing you you will need is time. If you are not familiar with VLANs, switches, and/or Linux, give yourself at least a week or more to learn, setup, and understand this project. If you are familiar, give yourself a couple of days.
Here is my setup:
Now that most of the mundane grunt work is done, now it is time to start working on some of the finer details.
If you are not still in it, log into your PacketFence and click on the "Configuration" tab. Look on the menu on the left hand side and make sure "General" is highlighted. Most of these setting should already be set but you will have to fine tune them for your setup. I will give you an overview of each setting.
After you have made all of your changes, make sure you click on the "Save" button. If you don't, all of your changes will be discarded.
Now, lets move on to the "Trapping" settings. I know there are a lot of settings here. I am just focusing on the ones that I have made changes in.
My initial reaction was the new version looks completely different than the older versions and I wasn't sure if I would like it. Now that I have used the new version, I have to say that I like the new web interface. There are a few things that are missing that I found helpful (such as being able to see the logs from web interface), but hopefully they will add them back in soon.
Anyway, on to what you have been waiting for:
How to setup PacketFence 4.0
Before we get knee-deep in configuring PacketFence, we need a few things. First you will need to determine what VLANs you want to use for Registration, Isolation, Inline, and MAC Detection. Next you will need to know all of the IP addresses of your switches that you want PacketFence to manage. If you have an Active Directory and you want to use it, there are some settings that you will need to know. (I will tell you what you need either later in this post or in a separate post.)
Another thing you you will need is time. If you are not familiar with VLANs, switches, and/or Linux, give yourself at least a week or more to learn, setup, and understand this project. If you are familiar, give yourself a couple of days.
Here is my setup:
- PacketFence 4.0.1 installed on a physical server. (I tried installing it on a Hyper-V server, but I had problems with a single NIC and the VLANs.)
- Management IP address: 10.10.10.10
- HP Procurve 2600 and 4100 series switches.
- VLANs
- Normal VLANs: 20-29
- Registration VLAN: 75
- Isolation VLAN: 76
- Inline (Guest) VLAN: 80
- MAC Detection VLAN: 77
Now, it is time to get our hands dirty. The first thing that I did after the initial install and config was to add the PacketFence server address to the end of ip-helper addresses in my HP 4100 switch. By doing this, the PacketFence server will start getting a copy of all the DHCP traffic and start populating its database. You can see this by logging on to your server and clicking on the Nodes tab. Just a personal note, I was surprised at some of the things that it found.
The switch command to add the PacketFence server is:
What I did next was add all the switches into PacketFence and all the neccessary commands to the switches. Depending on the amount of switches you have, this may take you a while. Since I had almost 50 switches, it took me almost an entire day to complete this task. The directions on how to get the switches and the PacketFence communicating with each other can be found here. I would suggest having the switches in Registration mode until you are ready to put the server into full production on your network.ip helper-address 10.10.10.10
Now that most of the mundane grunt work is done, now it is time to start working on some of the finer details.
If you are not still in it, log into your PacketFence and click on the "Configuration" tab. Look on the menu on the left hand side and make sure "General" is highlighted. Most of these setting should already be set but you will have to fine tune them for your setup. I will give you an overview of each setting.
- Domain: This is your domain name. In my case it is School.District.K12.State.US. Your domain may be as simple as Company.com.
- Hostname: This is the name of your server with the domain at the end. Example: PacketFence.Company.com
- DNS Servers: This is where you enter your production DNS server(s) IP address(es). If you have more than one, make sure you have a comma between each address. Here is how mine is setup: 10.10.10.5,10.10.10.6,127.0.0.1
- DHCP Servers: Same as the DNS servers, enter your production DHCP server(s) IP address(es). This will also help the PacketFence server determine if there is a rouge DCHP server on your network.
- Locale: Click in the box and select the language you want PacketFence to use. Mine is set to "en_US". If you need more than one language, you can select more.
- Timezone: I think this is self explanatory. A list can be found here. Just select a city in your timezone and paste it in to the textbox. My is set for "America/New_York"
- Maintaince Interval: I did not change anything here.
- Memcached Servers: I do not fully understand how memcached servers work yet. The idea is that you can have servers share their memory with one other.
After you have made all of your changes, make sure you click on the "Save" button. If you don't, all of your changes will be discarded.
Now, lets move on to the "Trapping" settings. I know there are a lot of settings here. I am just focusing on the ones that I have made changes in.
- Addresses Ranges: Enter the IP address range that you want PacketFence to monitor/detect/trap. For my testing purposes, I just entered one range: 10.10.11.0/24.
- Registration: I checked this box. This will force the node to register with the server.
- Whitelist: Enter the MAC addresses (with a comma separating each one) that you want PacketFence to allow through. At the moment, I am blocking all mobile devices and the whitelist allows the school administration iPads access.
- Redirect URL: This is the website that you want user directed back to one they have registered the device with PacketFence.
Make sure to save the settings.
Wednesday, April 24, 2013
Setup Local Centos (Or Any Linux Flavor) Local Repository Mirror
Since I have started using the Linux CentOS operating system, I have created a number of servers. When I do updates on these servers, all of the servers went straight out to the internet to retrieve their updates. Besides being a time consuming process, it was eating up a large amount of bandwidth.
This got me thinking
"Hey, Microsoft has a server service (WSUS) that downloads all of the updates for every product that they make. Can I create a local repository on my network that all of my CentOS servers get their updates from?"
After looking around on good for a couple of hours, I found the answer. The answer is "Yes, you can setup a local repository on your network."
Here is what I did to set up a local repository.
- I downloaded and installed the minimal version of CentOS 6.4.
* The nice thing I just found out about version 6.4 is that the Hyper-V drivers are included now, so no more downloading and installing the Linux Integration Components. That saves a great deal of time. - After the install finished, I set SELINUX to disabled and turned off the firewall and did a reboot. I know this is not the wisest thing to do, but hey, the only thing the server is doing is updating other servers.
- To disable SELINUX, open /etc/selinux/config, change "SELINUX=enforcing" to "SELINUX=disabled"
- To disable the firewall, type "chkconfig iptables off" and "chkconfig ip6tables off"
- Type "reboot" to restart the server. - Install http, php, and rsync. This will set the server up as a web server. You will use rsync to download a copy of a public repository to your local repository server.
- Type "yum install -y http php rsync" - Now, configure the http service to start on bootup and start the http service.
- Type "chkconfig --level 345 httpd on" for bootup
- Type "service httpd start" to start the service - Now, create a folder in the web server directory to keep all the update files. Because I may have different flavors of Linux in the future, I created a directory called "repo" with a sub-directory of "centos", then the different versions
- Type "mkdir /var/www/html/repo" - Next, sync your local repository with a public one. To save on space, I excluded the isos.
* If you want to include them, keep in mind that each version of CentOS you want to keep locally, you will need about 20GB of space.
- Type "rsync --progress -av --delete --delete-excluded --exclude "local*" --exclude "isos" rsync://centos.arcticnetwork.ca/centos/6.4/ /var/www/html/repo/centos/6.4/" - Because of how the repo works, we need to make a sym link from the 6.4 folder like this:
ln -s /var/www/html/repo/centos/6.4/ /var/www/html/repo/centos/6 - On the client computer (the ones needing updates) you need to edit the /etc/yum.repo.d/CentOS-Base.repo
- Remove the comment mark (#) from all of the baseurl and comment out the mirrorlist.
- Under baseurl, change "mirror.centos.org" to the IP address of your repository server and add "/repo". Here is how mine looks: "baseurl=http://192.168.1.10/repo/centos/$releasever/os/$basearch/" - Once you have made those changes and saved the file, we need to clear out the old settings. To do this type "yum clean all".
- After you clear out the settings, do a "yum update" and you will see that the client computer/server is now going to your local repository for its updates.
Once I finished setting up my local repository, I was able to update four servers in less than 10 minutes and one was a newly created server. That is a lot faster than the 30 minutes each server took before.
Subscribe to:
Posts (Atom)